I TO CLOUD COMPUTING

I AM

image
Hello,

I'm AKASH PATEL

10+ years of experience in Telecom/IT Cloud industry & Network Environment And Excellent Ability to troubleshoot Cloud/Infra/Network issues. Ability and willingness to keep abreast of technological developments with a strong ability to adapt quickly to rapidly changing the environment. Exceptional analytical, evaluative and technical problem-solving skills. Excellent organizational skills with the ability to work independently, to set priorities and to work efficiently under pressure, able to multitask and meet short/long term deadlines, work efficiency as a team member.

Also, I have a strong customer focus experience, be a great communicator, ability to diagnose and resolve complex service interruptions. Have initiative and passion to implement improvement strategies, in order to mitigate future outages and capacity to prioritize in a rapidly growing environment. self-starter and look for opportunities to prevent outages, rather than simply responding to troubles.


Education
RYERSON UNIVERSITY

Toronto,Canada.

MASTER ENGINEERING IN COMPUTER NETWORKS

B H GARDI COLLEGE OF ENG. & TECH.

Gujarat,India.

BACHELOR OF ENGINEERING IN COMPUTER SCIENCE


Experience
Cloud Engineer

Nokia

Senior Project Engineer

Wipro Limited

Deployment Engineer

INFINITY

Network Support Analyst

IBM

Network Field Engineer

BFG Enterprise Services

Technical Specialist

VODAFONE

Network Technician

Freelancer.com


Certifications
Google Professional Cloud Architect

Google

CKA: Certified Kubernetes Administrator

The Linux Foundation

Microsoft Certified: Azure Solutions Architect Expert

Microsoft

NCS R20 Integration Engineer

NOKIA

CCNA, CCNP TSHOOT, CCIE WRITTEN

Cisco

JNCIA-JUNOS

JUNIPER


My Skills
Cloud Troubleshooting
Cloud configuration
Cloud Design
Docker & Kubernets
Project Management
Cybersecurity
Firewall & Load Balancer

WHAT CAN I DO

DevOps

Responsible for the configuration, deployment, and day to day management of our customer's resources like server and application in a environment. and Managing the various branches of code & Automation of repetitive tasks.Conducting the testing protocol and critical monitoring.

Kubernetes

Responsible for all aspects of orchestration platform for managing, automating, and scaling containerized applications oprations. Orchestrate containers across multiple hosts.Make better use of hardware to maximize resources needed to run your enterprise apps. Control and automate application deployments and updates. Health-check and self-heal your apps with autoplacement, autorestart, autoreplication, and autoscaling.

Cloud Scale

As part of our fast-paced growing Cloud & Managed Services, we Responsible for adding or removing compute, storage, and network services to meet the demands a workload makes for resources in order to maintain availability and performance as utilization increases.

System

As a System Engineer performs a wide variety of installation, configuration and upgrading of workstations, servers and related hardware and software in system environment. Also, provides investigation, diagnostic testing and repair/resolution of system, hardware, software and infrastructure.

Troubleshooting

Primary goal is to make sure that your network equipment is operating properly at all times. But we all know that any equipment can break down. In case responsibility is to identify and isolate the cause of the malfunction and correct it as soon as you can.

LAN/WAN

Analyze, test, troubleshoot, and evaluate existing network systems, such as local area network (LAN), wide area network (WAN), and Internet systems or a segment of a network system. Perform network maintenance to ensure networks operate correctly with minimal interruption.

Firewall

Responsible for the configuration, deployment, and day to day management of our customer's next-generation firewall solution in a environment. monitoring, configuration changes, Firewall rule updates, accounts, and software updates while working alongside with team of cybersecurity experts.

Data Center

Responsible for all aspects of Data Center operations. With the help of Facilities and IT, manage the Data Center environment, monitor for issues, control access and ensure overall uninterrupted operations. Also, experience in a large, enterprise, multi-location data center environment, experience handling electrical and mechanical functions.

Cloud

As part of our fast-paced growing Cloud & Managed Services, we engaged across assigned customers to manage, support, secure and maintain their cloud or hosted environments. Also, maintain and grow our Cloud & Security knowledge and to ensure that we continue to comply to the best practices while being secure.

Blogs

Log4j: This is What We Have Learned so Far

Most organizations are likely impacted by the Log4j vulnerability. Although the situation continues to evolve, identifying and patching vulnerable systems offers the best protection against exploitation.

 It’s been a busy week for organizations scrambling to understand the implications of Log4j vulnerability CVE-2021-44228 (also known as Log4Shell). They are likely asking themselves the following types of questions:

  • Is Log4j running in our environment?
  • If so, are our Java applications vulnerable?
  • Are any of our applications being exploited?

It isn’t just you, it’s all of us

Almost all organizations have Log4j running in their environment. It is an integral part of a very large number of Java applications. Secureworks® Counter Threat Unit™ (CTU) researchers observed extensive scanning activity across the Secureworks customer base beginning around December 9, 2021. Some of that scanning was by security vendors, but a lot of it was not. Threat actors were quick to begin looking for vulnerable systems. CloudFlare observed limited testing of the vulnerability as early as December 1.

Notably, as of this publication the number of systems that have been compromised is small compared to the number of systems that were scanned. Secureworks incident responders are dealing with only a handful of engagements despite the widespread nature of the vulnerability. That proportion could change as threat actors incorporate this vulnerability into their playbooks.

It’s not too late to patch

There are a few reasons why there might be fewer compromises than expected:

  • Many threat actors may have not yet begun to exploit the flaw. If that is the case, the situation is likely to change quite quickly. CTU™ researchers have already observed post-exploitation activity that can be attributed to known government-sponsored threat groups.
  • Post-exploitation activity could be difficult to detect. It’s always possible that exploitation is happening when or where there isn’t visibility. Secureworks researchers are observing high volumes of detections for scan traffic, and the countermeasure and Taegis™ VDR teams are generating new countermeasures daily based on the evolving understanding of the vulnerability from the Secureworks Adversary Group. Importantly, countermeasures already in place to detect post-exploitation activity (e.g., cryptocurrency miners, web shells, Cobalt Strike) remain effective. In the limited number of identified compromises, Secureworks incident responders detected follow-on activity. Despite the somewhat novel delivery method (although it was being talked about in 2016), the malware being dropped on compromised systems is common.
  • It is possible that remote code execution is proving harder for attackers than initially thought. Confirming that a system is vulnerable is not the same as being able to run additional code on it. Successful exploitation relies on multiple variables, including the version of Java running, how verbose the logging is, which input elements are being logged, and whether traffic is allowed to egress from vulnerable servers. This would not be the first time that exploits that run relatively easily in testing or against honeypots are less reliable when pointed at complex enterprise environments that have different configurations and system dependencies.

Know your attack surface

If you’re running the vulnerable code (and most organizations are), identifying where the vulnerable code is running is the first step. Organizations are quickly realizing the inconvenient truth that understanding dependencies in their own systems is extremely challenging. The potential for threat actors to leverage this vulnerability for lateral movement once inside a network means that you also need to secure non-internet facing systems. Knowing what infrastructure you are protecting is always key, but never more so than this week. Regardless of any impact from exploitation of this vulnerability, just the act of attempting to mitigate the risk of vulnerable applications will likely consume enormous amounts of time for IT and security teams.

Bottom line

Organizations that are struggling to respond to this situation should focus on three actions:

  • Identify systems with vulnerable versions of Log4j, prioritizing those that are internet-facing. Authenticated scanners are the most straightforward way to perform this check if you have that capability.
  • Patch vulnerable systems. If you can’t patch, apply the mitigations provided by Apache.
  • Investigate for evidence of compromise on potentially impacted systems. Review server logs, analyze network and host telemetry, and review file systems for indications of new and suspicious file creation. Also monitor alerts from countermeasures that could indicate follow-on activity.

What is 5G Next Generation Network?

In today’s growing digital world every consumer needs more data speed and surfing data on the Internet. To  Finish this high requirement today world move from 4G to the 5G world. This year, the world's first 5G network was launched, promised faster data transfer speed and lower latency. In addition, 5G has opened the way for new industrial applications and has become a key factor in achieving a “smart city”. 5G provides a better network for our increasingly technological world today. So, Our Main Question what is 5G?

What Is 5G?


5G, just like 4G technology, is an evolving standard, which is planned for and created by the 3rd Generation Partnership Project (3GPP) and International Telecommunications Union (ITU). The ITU’s IMT-2020preparations and 3GPP Release 15 specification lay the foundations for early 5G technology and rollouts.

This specification outlines the 5G technologies required to build a futuristic network. High-frequency mmWave base stations, WiFi mid-small cells almost or lower 6 GHz, beamforming, and large-range multiple input and output (MIMO) are just a few of the more common techniques. There are also some major changes in data coding and infrastructure network slicing, but these changes are rarely discussed. These are new technologies compared to today's 4G LTE networks.

The 5G standard is divided into two key parts – New Radio (NR) and Non-Standalone (NSA). Today’s first 5G networks will be based on NSA, and are planned to eventually transition over to SA once that part of the specification is finalized in the ’20s. However, Verizon plans to adopt the mainstream 5G later. So, Again Now Main Question is How're 5G works?


How're 5G Network works?


The most commonly talked about 5G technology is mmWave, but operators will also take advantage of the new spectrum to lower the 6GHz WiFi area, based on low-frequency bands below 1GHz and the existing 4G LTE bands too. There are currently a large number of unused high frequencies called millimeter waves. The higher the frequency, the more available bandwidth, but the technology is shorter than the range of low-frequency coverage used in 4G LTE.


The overall idea general is to greatly increase the amount of spectrum available by combining the pros and cons of all these different frequencies. Combining more spectrum with carrier aggregation (sending data over multiple pieces of the spectrum) allows consumers for more bandwidth and much faster speeds.


So, what key Features works for 5G?

Here’s a breakdown all the 5G  key technology terms that you need to know:


Massive MIMO: Multiple antennas on base stations continually serve multiple end-user devices at once. Designed to make high-frequency networks much more efficient and can be combined with beamforming.


Low-band basebands: Very low frequencies below 800MHz. Covers a very long distance and it is omnidirectional to provide blanket backbone coverage like carpet-based trunk coverage


mmWave: High frequency between Between 17-100GHz, with extremely high bandwidth for fast data. Most operators carriers aim to be used in the 18-24 GHz range. This short-range technology will be used in densely populated areas.


Beamforming: This is used in mmWave technology and lower than 6GHz base stations directing waveforms towards consumer devices, such as bouncing waves off buildings. A key technology in overcoming the high range and direction limitations of high-frequency waveforms.


Sub-6GHz: A operates in WiFi-like frequency between 3-6 GHz. Small cellular hubs or more powerful outdoor base stations that can be deployed indoors, like the existing 4G LTE, with medium coverage. Most 5G spectrum can be found here.


Although many carriers like to talk up fancy advancements in mmWave technology, 5G networks are actually a combination of everything. The various combination technologies can be thought of in three tiers, which Huawei explains neatly in many of its papers.

Low range frequency bands that can be repurposed from radio and TV make up the “coverage layer” at sub 2GHz. This provides wide-area and deep indoor coverage and forms the backbone of the network. There’s the “Super Data Layer” made up of high-frequency spectrum known as mmWave that suits areas requiring extremely high data rates or population coverage. Then the “coverage and capacity layer” sits between 2 and 6 GHz, which offers a good balance between both.
In Conclusion,5G allows consumers to connect and leverage the profits of this wide range of spectrum for faster, and more reliable coverage.


5G vs 4G – key differences

Compared to 3.5G,4G LTE, 5G networks will be consistently much faster. Minimum user rate speeds increase from just 10Mbps to 100Mbps, a 10x increase. also, delay or Latency is set to fall by a similar amount, from 10ms to just 1ms when compared to LTE-Advanced. The big increase in bandwidth also means that 5G will be able to handle up to one million devices per square kilometre, another which is 10 fold increase than LTE-A, all with a 10x boost to network energy efficiency.


As we have covered previously, the range of networking technologies greatly increases too. LTE has undergone many improvements over the years. From the introduction of 256QAM and carrier aggregation with LTE-A to support for wider use of unlicensed spectrum through LAA, LWA, and Multefire with LTE-A Pro. This is why today’s 4G network is much faster than those built during the initial rollout all those years ago.


5G advances another step further, mandating the use of 256QAM and improving carrier aggregation technology to support more flexible carrier bands across the unlicensed spectrum, sub-6GHz, and mmWave frequencies. The image below from Arm all the way back in 2016 explains this core difference rather succinctly.


Where you can Advance use Of 5G?


Autonomous vehicles:

Nowadays see autonomous vehicles rise at the same rate that Technology is deployed across the world. In that trend, your vehicle will communicate with other vehicles on the road, So That Can provide information about other cars about road conditions, and Giving a Condition performance information to drivers and automakers. If a car brakes quickly up ahead, yours may learn about it immediately and preemptively brake as well, preventing a collision. So, you can use the Autopilot System. This kind of vehicle-to-vehicle communication could give you ultimately save & make safe thousands of lives.

Remote device control:
One of great feature 5G has very low latency, Because of this feature-heavy machinery can be remote control will become a reality. Also, the Main goal is to reduce risk in hazardous environments, in-short this feature allows technicians with specialized skills to control machinery from anywhere in the world.

Public safety and infrastructure:
5G will make cities and other municipalities to operate more easily & efficiently. Because of 5G companies will be able easily to track usage Utility remotely. Also, sensors can notify public works departments when a major incident like streets lights go out, drains flood or Traffic Light Signal Not works, and municipalities will be able to install surveillance cameras and manage cities better ways.

IoT:
5G's most exciting and crucial aspects of effect on the Internet of Things. In today world technology keeps growing and currently, we have sensors that can communicate with each other, With 5G speeds and low latencies, the IoT will be powered by communications among sensors and smart devices. So, In-short nowadays smart devices on the market require fewer resources, but huge numbers of these devices can connect to a single base station, So, that point 5G making them much more reliable.


5G network as an around Global

The world is gearing up for the launch of 5G, both network operators and device manufacturers. As with the adoption of 4G LTE networks, 5G will be a staged process and some countries will launch their networks well ahead of others.


The mid-2019 is a day to eye on, as both 5G smartphones and networks will be open & available to the first of consumers. However, by 2020 and 2021,the increment of deployment is expected to expand globally 50%. Even by 2023, only 80% of consumers are expected to have 5G smartphones and network connections.

How To Create an Image of Your Linux Environment and Launch It!!

Introduction

DigitalOcean's Custom Images feature allows you to bring your custom Linux and Unix-like virtual disk images from an on-premises environment or another cloud platform to DigitalOcean and use them to start DigitalOcean Droplets.
As described in the Custom Images documentation, the following image types are supported natively by the Custom Images upload tool:
Although ISO format images aren't officially supported, you can learn how to create and upload a compatible image using VirtualBox by following How to Create a DigitalOcean Droplet from an Ubuntu ISO Format Image.
If you don't already have a compatible image to upload to DigitalOcean, you can create and compress a disk image of your Unix-like or Linux system, provided it has the prerequisite software and drivers installed.
We'll begin by ensuring that our image meets the Custom Images requirements. To do this, we'll configure the system and install some software prerequisites. Then, we'll create the image using the dd command-line utility and compress it using gzip. Following that, we'll upload this compressed image file to DigitalOcean Spaces, from which we can import it as a Custom Image. Finally, we'll boot up a Droplet using the uploaded image.

Prerequisites

If possible, you should use one of the DigitalOcean-provided images as a base, or an official distribution-provided cloud image like Ubuntu Cloud. You can then install software and applications on top of this base image to bake a new image, using tools like Packer and VirtualBox. Many cloud providers and virtualization environments also provide tools to export virtual disks to one of the compatible formats listed above, so, if possible, you should use these to simplify the import process. In the cases where you need to manually create a disk image of your system, you can follow the instructions in this guide. Note that these instructions have only been tested with an Ubuntu 18.04 system, and steps may vary depending on your server's OS and configuration.
Before you begin with this tutorial, you should have the following available to you:
  • A Linux or Unix-like system that meets all of the requirements listed in the Custom Images product documentation. For example, your boot disk must have:
    • A max size of 100GB
    • An MBR or GPT partition table with a grub bootloader
    • VirtIO drivers installed
  • A non-root user with administrative privileges available to you on the system you’re imaging. To create a new user and grant it administrative privileges on Ubuntu 18.04, follow our Initial Server Setup with Ubuntu 18.04. To learn how to do this on Debian 9, consult Initial Server Setup with Debian 9.
  • An additional storage device used to store the disk image created in this guide, preferably as large as the disk being copied. This can be an attached block storage volume, an external USB drive, an additional physical disk, etc.
  • A DigitalOcean Space and the s3cmd file transfer utility configured for use with your Space. To learn how to create a Space, consult the Spaces Quickstart. To learn how set up s3cmd for use with your Space, consult the s3cmd 2.x Setup Guide.

Step 1 — Installing Cloud-Init and Enabling SSH

To begin, we will install the cloud-Init initialization package. Cloud-init is a set of scripts that runs at boot to configure certain cloud instance properties like default locale, hostname, SSH keys and network devices.
Steps for installing cloud-init will vary depending on the operating system you have installed. In general, the cloud-init package should be available in your OS's package manager, so if you're not using a Debian-based distribution, you should substitute apt in the following steps with your distribution-specific package manager command.

Installing cloud-init

In this guide, we'll use an Ubuntu 18.04 server and so will use apt to download and install the cloud-init package. Note that cloud-init may already be installed on your system (some Linux distributions install cloud-init by default). To check, log in to your server and run the following command:
  • cloud-init
If you see the following output, cloud-init has already been installed on your server and you can continue on to configuring it for use with DigitalOcean:
Output
usage: /usr/bin/cloud-init [-h] [--version] [--file FILES] [--debug] [--force] {init,modules,single,query,dhclient-hook,features,analyze,devel,collect-logs,clean,status} ... /usr/bin/cloud-init: error: the following arguments are required: subcommand
If instead you see the following, you need to install cloud-init:
Output
cloud-init: command not found
To install cloud-init, update your package index and then install the package using apt:
  • sudo apt update
  • sudo apt install cloud-init
Now that we've installed cloud-init, we'll configure it for use with DigitalOcean, ensuring that it uses the ConfigDrive datasource. Cloud-init datasources dictate how cloud-init will search for and update instance configuration and metadata. DigitalOcean Droplets use the ConfigDrive datasource, so we will check that it comes first in the list of datasources that cloud-init searches whenever the Droplet boots.

Reconfiguring cloud-init

By default, on Ubuntu 18.04, cloud-init configures itself to use the NoCloud datasource first. This will cause problems when running the image on DigitalOcean, so we need to reconfigure cloud-init to use the ConfigDrive datasource and ensure that cloud-init reruns when the image is launched on DigitalOcean.
From the command line, navigate to the /etc/cloud/cloud.cfg.d directory:
  • cd /etc/cloud/cloud.cfg.d
Use the ls command to list the cloud-init config files present in the directory:
  • ls
Output
05_logging.cfg 50-curtin-networking.cfg 90_dpkg.cfg curtin-preserve-sources.cfg README
Depending on your installation, some of these files may not be present. If present, delete the 50-curtin-networking.cfg file, which configures networking interfaces for your Ubuntu server. When the image is launched on DigitalOcean, cloud-init will run and reconfigure these interfaces automatically, so this file is not necessary. If this file is not deleted, the DigitalOcean Droplet created from this Ubuntu image will have its interfaces misconfigured and won't be accessible from the internet:
  • sudo rm 50-curtin-networking.cfg
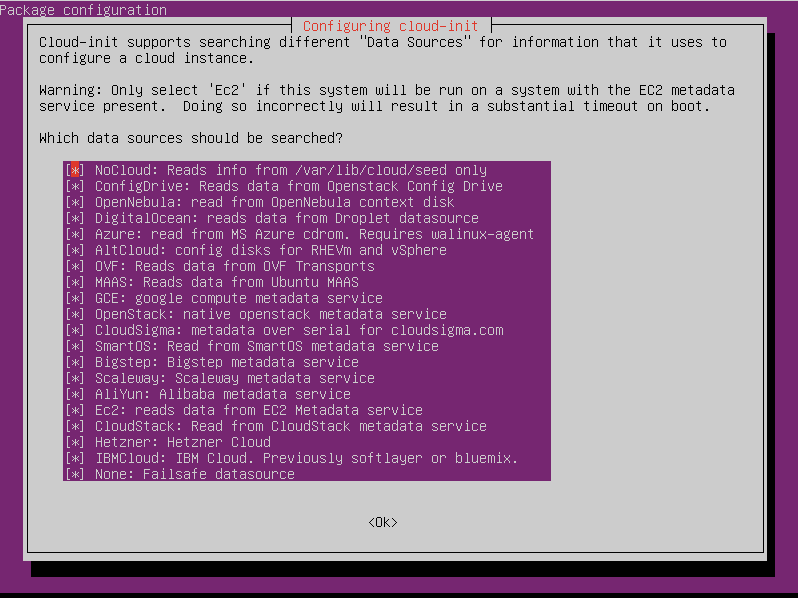
Next, we'll run dpkg-reconfigure cloud-init to remove the NoCloud datasource, ensuring that cloud-init searches for and finds the ConfigDrive datasource used on DigitalOcean:
  • sudo dpkg-reconfigure cloud-init
You should see the following graphical menu:
Cloud Init dpkg Menu
The NoCloud datasource is initially highlighted. Press SPACE to unselect it, then hit ENTER.
Finally, navigate to /etc/netplan:
  • cd /etc/netplan
Remove the 50-cloud-init.yaml file, which was generated from the cloud-init networking file we removed previously:
  • sudo rm 50-cloud-init.yaml
The final step is ensuring that we clean up configuration from the initial cloud-init run so that it reruns when the image is launched on DigitalOcean.
To do this, run cloud-init clean:
  • sudo cloud-init clean
At this point you've installed and configured cloud-init for use with DigitalOcean. You can now move on to enabling SSH access to your droplet.

Enable SSH Access

Once you've installed and configured cloud-init, the next step is to ensure that you have a non-root admin user and password available to you on your machine, as outlined in the prerequisites. This step is essential to diagnose any errors that may arise after uploading your image and launching your Droplet. If a preexisting network configuration or bad cloud-init configuration renders your Droplet inaccesible over the network, you can use this user in combination with the DigitalOcean Droplet Console to access your system and diagnose any problems that may have surfaced.
Once you've set up your non-root administrative user, the final step is to ensure that you have an SSH server installed and running. SSH often comes preinstalled on many popular Linux distributions. The process for checking whether a service is running will vary depending on your server's operating system.. If you aren't sure of how to do this, consult your OS's documentation on managing services. On Ubuntu, you can verify that SSH is up and running using the following command:
  • sudo service ssh status
You should see the following output:
Output
● ssh.service - OpenBSD Secure Shell server Loaded: loaded (/lib/systemd/system/ssh.service; enabled; vendor preset: enabled) Active: active (running) since Mon 2018-10-22 19:59:38 UTC; 8 days 1h ago Docs: man:sshd(8) man:sshd_config(5) Process: 1092 ExecStartPre=/usr/sbin/sshd -t (code=exited, status=0/SUCCESS) Main PID: 1115 (sshd) Tasks: 1 (limit: 4915) Memory: 9.7M CGroup: /system.slice/ssh.service └─1115 /usr/sbin/sshd -D
If SSH isn't up and running, you can install it using apt (on Debian-based distributions):
  • sudo apt install openssh-server
By default, the SSH server will start on boot unless configured otherwise. This is desirable when running the system in the cloud, as DigitalOcean can automatically copy in your public key and grant you immediate SSH access to your Droplet after creation.
Once you've created a non-root administrative user, enabled SSH, and installed cloud-init, you're ready to move on to creating an image of your boot disk.

Step 2 — Creating Disk Image

In this step, we'll create a RAW format disk image using the dd command-line utility, and compress it using gzip. We'll then upload the image to DigitalOcean Spaces using s3cmd.
To begin, log in to your server, and inspect the block device arrangement for your system using lsblk:
  • lsblk
You should see something like the following:
Output
NAME MAJ:MIN RM SIZE RO TYPE MOUNTPOINT loop0 7:0 0 12.7M 1 loop /snap/amazon-ssm-agent/495 loop1 7:1 0 87.9M 1 loop /snap/core/5328 vda 252:0 0 25G 0 disk └─vda1 252:1 0 25G 0 part / vdb 252:16 0 420K 1 disk
In this case, we notice that our main boot disk is /dev/vda, a 25GB disk, and the primary partition, mounted at /, is /dev/vda1. In most cases the disk containing the partition mounted at / will be the source disk to image. We are going to use dd to create an image of /dev/vda.
At this point, you should decide where you want to store the disk image. One option is to attach another block storage device, preferably as large as the disk you are going to image. You can then save the image to this attached temporary disk and upload it to DigitalOcean Spaces.
If you have physical access to the server, you can add an additional drive to the machine or attach another storage device, like an external USB disk.
Another option, which we'll demonstrate in this guide, is copying the image over SSH to a local machine, from which you can upload it to Spaces.
No matter which method you choose to follow, ensure that the storage device to which you save the compressed image has enough free space. If the disk you're imaging is mostly empty, you can expect the compressed image file to be significantly smaller than the original disk.
Warning: Before running the following dd command, ensure that any critical applications have been stopped and your system is as quiet as possible. Copying an actively-used disk may result in some corrupted files, so be sure to halt any data-intensive operations and shut down as many running applications as possible. 

Option 1: Creating Image Locally

The syntax for the dd command we're going to execute looks as follows:
  • dd if=/dev/vda bs=4M conv=sparse | pv -s 25G | gzip > /mnt/tmp_disk/ubuntu.gz
In this case, we are selecting /dev/vda as the input disk to image, and setting the input/output block sizes to 4MB (from the default 512 bytes). This generally speeds things up a little bit. In addition, we are using the conv=sparse flag to minimize the output file size by skipping over empty space. To learn more about dd's parameters, consult the dd manpage.
We then pipe the output to the pv pipe viewer utility so we can visually track the progress of the transfer (this pipe is optional, and requires installing pv using your package manager). If you know the size of the initial disk (in this case it's 25G), you can add the -s 25G to the pv pipe to get an ETA for when the transfer will complete.
We then pipe it all to gzip, and save it in a file called ubuntu.gz on the temporary block storage volume we've attached to the server. Replace /mnt/tmp_disk with the path to the external storage device you've attached to your server.

Option 2: Creating Image over SSH

Instead of provisioning additional storage for your remote machine, you can also execute the copy over SSH if you have enough disk space available on your local machine. Note that depending on the bandwidth available to you, this can be slow and you may incur additional costs for data transfer over the network.
To copy and compress the disk over SSH, execute the following command on your local machine:
  • ssh remote_user@your_server_ip "sudo dd if=/dev/vda bs=4M conv=sparse | gzip -1 -" | dd of=ubuntu.gz
In this case, we are SSHing into our remote server, executing the dd command there, and piping the output to gzip. We then transfer the gzip output over the network and save it as ubuntu.gz locally. Ensure you have the dd utility available on your local machine before running this command:
  • which dd
Output
/bin/dd
Create the compressed image file using either of the above methods. This may take several hours, depending on the size of the disk you're imaging and the method you're using to create the image.
Once you've created the compressed image file, you can move on to uploading it to your DigitalOcean Spaces using s3cmd.

Step 3 — Uploading Image to Spaces and Custom Images

As described in the prerequisites, you should have s3cmd installed and configured for use with your DigitalOcean Space on the machine containing your compressed image.
Locate the compressed image file, and upload it to your Space using s3cmd:
Note: You should replace your_space_name with your Space’s name and not its URL. For example, if your Space’s URL is https://example-space-name.nyc3.digitaloceanspaces.com, then your Space’s name is example-space-name.
  • s3cmd put /path_to_image/ubuntu.gz s3://your_space_name
Once the upload completes, navigate to your Space using the DigitalOcean Control Panel, and locate the image in the list of files. We will temporarily make the image publicly accessible so that Custom Images can access it and save a copy.
At the right-hand side of the image listing, click the More drop down menu, then click into Manage Permissions:
Spaces Object Configuration
Then, click the radio button next to Public and hit Update to make the image publicly accessible.
Warning: Your image will temporarily be publicly accessible to anyone with its Spaces path during this process. If you'd like to avoid making your image temporarily public, you can create your Custom Image using the DigitalOcean API. Be sure to set your image to Private using the above procedure after your image has successfully been transferred to Custom Images.
Fetch the Spaces URL for your image by hovering over the image name in the Control Panel, and hit Copy URL in the window that pops up.
Now, navigate to Images in the left hand navigation bar, and then Custom Images.
From here, upload your image using this URL as detailed in the Custom Images Product Documentation.
You can then create a Droplet from this image. Note that you need to add an SSH key to the Droplet on creation. To learn how to do this, consult How to Add SSH Keys to Droplets.
Once your Droplet boots up, if you can SSH into it, you've successfully launched your Custom Image as a DigitalOcean Droplet.

Debugging

If you attempt to SSH into your Droplet and are unable to connect, ensure that your image meets the listed requirements and has both cloud-init and SSH installed and properly configured. If you still can't access the Droplet, you can attempt to use the DigitalOcean Droplet Console and the non-root user you created earlier to explore the system and debug your networking, cloud-init and SSH configurations. Another way of debugging your image is to use a virtualization tool like Virtualbox to boot up your disk image inside of a virtual machine, and debug your system's configuration from within the VM.

Conclusion

In this guide, you've learned how to create a disk image of an Ubuntu 18.04 system using the ddcommand line utility and upload it to DigitalOcean as a Custom Image from which you can launch Droplets.
The steps in this guide may vary depending on your operating system, existing hardware, and kernel configuration but, in general, images created from popular Linux distributions should work using this method. Be sure to carefully follow the steps for installing and configuring cloud-init, and ensure that your system meets all the requirements listed in the prerequisites section above.
To learn more about Custom Images, consult the Custom Images product documentation.

Start Work With Me

Contact Me
Akash Patel
+1 647-473-6333
Toronto, Canada