Introduction
DigitalOcean's Custom Images feature allows you to bring your custom Linux and Unix-like virtual disk images from an on-premises environment or another cloud platform to DigitalOcean and use them to start DigitalOcean Droplets.
As described in the Custom Images documentation, the following image types are supported natively by the Custom Images upload tool:
Although ISO format images aren't officially supported, you can learn how to create and upload a compatible image using VirtualBox by following How to Create a DigitalOcean Droplet from an Ubuntu ISO Format Image.
If you don't already have a compatible image to upload to DigitalOcean, you can create and compress a disk image of your Unix-like or Linux system, provided it has the prerequisite software and drivers installed.
We'll begin by ensuring that our image meets the Custom Images requirements. To do this, we'll configure the system and install some software prerequisites. Then, we'll create the image using the
dd command-line utility and compress it using gzip. Following that, we'll upload this compressed image file to DigitalOcean Spaces, from which we can import it as a Custom Image. Finally, we'll boot up a Droplet using the uploaded image.Prerequisites
If possible, you should use one of the DigitalOcean-provided images as a base, or an official distribution-provided cloud image like Ubuntu Cloud. You can then install software and applications on top of this base image to bake a new image, using tools like Packer and VirtualBox. Many cloud providers and virtualization environments also provide tools to export virtual disks to one of the compatible formats listed above, so, if possible, you should use these to simplify the import process. In the cases where you need to manually create a disk image of your system, you can follow the instructions in this guide. Note that these instructions have only been tested with an Ubuntu 18.04 system, and steps may vary depending on your server's OS and configuration.
Before you begin with this tutorial, you should have the following available to you:
- A Linux or Unix-like system that meets all of the requirements listed in the Custom Images product documentation. For example, your boot disk must have:
- A max size of 100GB
- An MBR or GPT partition table with a
grubbootloader - VirtIO drivers installed
- A non-root user with administrative privileges available to you on the system you’re imaging. To create a new user and grant it administrative privileges on Ubuntu 18.04, follow our Initial Server Setup with Ubuntu 18.04. To learn how to do this on Debian 9, consult Initial Server Setup with Debian 9.
- An additional storage device used to store the disk image created in this guide, preferably as large as the disk being copied. This can be an attached block storage volume, an external USB drive, an additional physical disk, etc.
- A DigitalOcean Space and the
s3cmdfile transfer utility configured for use with your Space. To learn how to create a Space, consult the Spaces Quickstart. To learn how set ups3cmdfor use with your Space, consult the s3cmd 2.x Setup Guide.
Step 1 — Installing Cloud-Init and Enabling SSH
To begin, we will install the cloud-Init initialization package. Cloud-init is a set of scripts that runs at boot to configure certain cloud instance properties like default locale, hostname, SSH keys and network devices.
Steps for installing cloud-init will vary depending on the operating system you have installed. In general, the
cloud-init package should be available in your OS's package manager, so if you're not using a Debian-based distribution, you should substitute apt in the following steps with your distribution-specific package manager command.
Installing cloud-init
In this guide, we'll use an Ubuntu 18.04 server and so will use
apt to download and install the cloud-init package. Note that cloud-init may already be installed on your system (some Linux distributions install cloud-init by default). To check, log in to your server and run the following command:
- cloud-init
If you see the following output,
cloud-init has already been installed on your server and you can continue on to configuring it for use with DigitalOcean:
Output
usage: /usr/bin/cloud-init [-h] [--version] [--file FILES] [--debug] [--force]
                           {init,modules,single,query,dhclient-hook,features,analyze,devel,collect-logs,clean,status}
                           ...
/usr/bin/cloud-init: error: the following arguments are required: subcommand
If instead you see the following, you need to install
cloud-init:
Output
cloud-init: command not found
To install
cloud-init, update your package index and then install the package using apt:
- sudo apt update
- sudo apt install cloud-init
Now that we've installed
cloud-init, we'll configure it for use with DigitalOcean, ensuring that it uses the ConfigDrive datasource. Cloud-init datasources dictate how cloud-init will search for and update instance configuration and metadata. DigitalOcean Droplets use the ConfigDrive datasource, so we will check that it comes first in the list of datasources that cloud-init searches whenever the Droplet boots.
Reconfiguring cloud-init
By default, on Ubuntu 18.04,
cloud-init configures itself to use the NoCloud datasource first. This will cause problems when running the image on DigitalOcean, so we need to reconfigure cloud-init to use the ConfigDrive datasource and ensure that cloud-init reruns when the image is launched on DigitalOcean.
From the command line, navigate to the
/etc/cloud/cloud.cfg.d directory:
- cd /etc/cloud/cloud.cfg.d
Use the
ls command to list the cloud-init config files present in the directory:
- ls
Output
05_logging.cfg  50-curtin-networking.cfg  90_dpkg.cfg  curtin-preserve-sources.cfg  README
Depending on your installation, some of these files may not be present. If present, delete the
50-curtin-networking.cfg file, which configures networking interfaces for your Ubuntu server. When the image is launched on DigitalOcean, cloud-init will run and reconfigure these interfaces automatically, so this file is not necessary. If this file is not deleted, the DigitalOcean Droplet created from this Ubuntu image will have its interfaces misconfigured and won't be accessible from the internet:
- sudo rm 50-curtin-networking.cfg
Next, we'll run
dpkg-reconfigure cloud-init to remove the NoCloud datasource, ensuring that cloud-init searches for and finds the ConfigDrive datasource used on DigitalOcean:
- sudo dpkg-reconfigure cloud-init
You should see the following graphical menu:
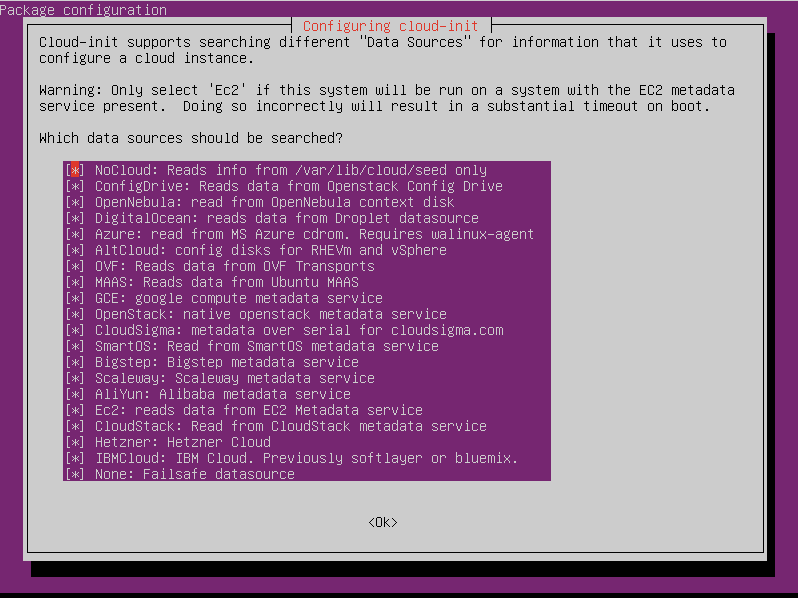
The
NoCloud datasource is initially highlighted. Press SPACE to unselect it, then hit ENTER.
Finally, navigate to
/etc/netplan:
- cd /etc/netplan
Remove the
50-cloud-init.yaml file, which was generated from the cloud-init networking file we removed previously:
- sudo rm 50-cloud-init.yaml
The final step is ensuring that we clean up configuration from the initial
cloud-init run so that it reruns when the image is launched on DigitalOcean.
To do this, run
cloud-init clean:
- sudo cloud-init clean
At this point you've installed and configured
cloud-init for use with DigitalOcean. You can now move on to enabling SSH access to your droplet.Enable SSH Access
Once you've installed and configured
cloud-init, the next step is to ensure that you have a non-root admin user and password available to you on your machine, as outlined in the prerequisites. This step is essential to diagnose any errors that may arise after uploading your image and launching your Droplet. If a preexisting network configuration or bad cloud-init configuration renders your Droplet inaccesible over the network, you can use this user in combination with the DigitalOcean Droplet Console to access your system and diagnose any problems that may have surfaced.
Once you've set up your non-root administrative user, the final step is to ensure that you have an SSH server installed and running. SSH often comes preinstalled on many popular Linux distributions. The process for checking whether a service is running will vary depending on your server's operating system.. If you aren't sure of how to do this, consult your OS's documentation on managing services. On Ubuntu, you can verify that SSH is up and running using the following command:
- sudo service ssh status
You should see the following output:
Output
● ssh.service - OpenBSD Secure Shell server
   Loaded: loaded (/lib/systemd/system/ssh.service; enabled; vendor preset: enabled)
   Active: active (running) since Mon 2018-10-22 19:59:38 UTC; 8 days 1h ago
     Docs: man:sshd(8)
           man:sshd_config(5)
  Process: 1092 ExecStartPre=/usr/sbin/sshd -t (code=exited, status=0/SUCCESS)
 Main PID: 1115 (sshd)
    Tasks: 1 (limit: 4915)
   Memory: 9.7M
   CGroup: /system.slice/ssh.service
           └─1115 /usr/sbin/sshd -D
If SSH isn't up and running, you can install it using
apt (on Debian-based distributions):
- sudo apt install openssh-server
By default, the SSH server will start on boot unless configured otherwise. This is desirable when running the system in the cloud, as DigitalOcean can automatically copy in your public key and grant you immediate SSH access to your Droplet after creation.
Once you've created a non-root administrative user, enabled SSH, and installed cloud-init, you're ready to move on to creating an image of your boot disk.
Step 2 — Creating Disk Image
In this step, we'll create a RAW format disk image using the
dd command-line utility, and compress it using gzip. We'll then upload the image to DigitalOcean Spaces using s3cmd.
To begin, log in to your server, and inspect the block device arrangement for your system using
lsblk:
- lsblk
You should see something like the following:
Output
NAME   MAJ:MIN RM  SIZE RO TYPE MOUNTPOINT
loop0    7:0    0 12.7M  1 loop /snap/amazon-ssm-agent/495
loop1    7:1    0 87.9M  1 loop /snap/core/5328
vda    252:0    0   25G  0 disk
└─vda1 252:1    0   25G  0 part /
vdb    252:16   0  420K  1 disk
In this case, we notice that our main boot disk is
/dev/vda, a 25GB disk, and the primary partition, mounted at /, is /dev/vda1. In most cases the disk containing the partition mounted at / will be the source disk to image. We are going to use dd to create an image of /dev/vda.
At this point, you should decide where you want to store the disk image. One option is to attach another block storage device, preferably as large as the disk you are going to image. You can then save the image to this attached temporary disk and upload it to DigitalOcean Spaces.
If you have physical access to the server, you can add an additional drive to the machine or attach another storage device, like an external USB disk.
Another option, which we'll demonstrate in this guide, is copying the image over SSH to a local machine, from which you can upload it to Spaces.
No matter which method you choose to follow, ensure that the storage device to which you save the compressed image has enough free space. If the disk you're imaging is mostly empty, you can expect the compressed image file to be significantly smaller than the original disk.
Warning: Before running the following
dd command, ensure that any critical applications have been stopped and your system is as quiet as possible. Copying an actively-used disk may result in some corrupted files, so be sure to halt any data-intensive operations and shut down as many running applications as possible. Option 1: Creating Image Locally
The syntax for the
dd command we're going to execute looks as follows:
- dd if=/dev/vda bs=4M conv=sparse | pv -s 25G | gzip > /mnt/tmp_disk/ubuntu.gz
In this case, we are selecting
/dev/vda as the input disk to image, and setting the input/output block sizes to 4MB (from the default 512 bytes). This generally speeds things up a little bit. In addition, we are using the conv=sparse flag to minimize the output file size by skipping over empty space. To learn more about dd's parameters, consult the dd manpage.
We then pipe the output to the
pv pipe viewer utility so we can visually track the progress of the transfer (this pipe is optional, and requires installing pv using your package manager). If you know the size of the initial disk (in this case it's 25G), you can add the -s 25G to the pv pipe to get an ETA for when the transfer will complete.
We then pipe it all to
gzip, and save it in a file called ubuntu.gz on the temporary block storage volume we've attached to the server. Replace /mnt/tmp_disk with the path to the external storage device you've attached to your server.Option 2: Creating Image over SSH
Instead of provisioning additional storage for your remote machine, you can also execute the copy over SSH if you have enough disk space available on your local machine. Note that depending on the bandwidth available to you, this can be slow and you may incur additional costs for data transfer over the network.
To copy and compress the disk over SSH, execute the following command on your local machine:
- ssh remote_user@your_server_ip "sudo dd if=/dev/vda bs=4M conv=sparse | gzip -1 -" | dd of=ubuntu.gz
In this case, we are SSHing into our remote server, executing the
dd command there, and piping the output to gzip. We then transfer the gzip output over the network and save it as ubuntu.gz locally. Ensure you have the dd utility available on your local machine before running this command:
- which dd
Output
/bin/dd
Create the compressed image file using either of the above methods. This may take several hours, depending on the size of the disk you're imaging and the method you're using to create the image.
Once you've created the compressed image file, you can move on to uploading it to your DigitalOcean Spaces using
s3cmd.Step 3 — Uploading Image to Spaces and Custom Images
As described in the prerequisites, you should have
s3cmd installed and configured for use with your DigitalOcean Space on the machine containing your compressed image.
Locate the compressed image file, and upload it to your Space using
s3cmd:
Note: You should replace
your_space_name with your Space’s name and not its URL. For example, if your Space’s URL is https://example-space-name.nyc3.digitaloceanspaces.com, then your Space’s name is example-space-name.
- s3cmd put /path_to_image/ubuntu.gz s3://your_space_name
Once the upload completes, navigate to your Space using the DigitalOcean Control Panel, and locate the image in the list of files. We will temporarily make the image publicly accessible so that Custom Images can access it and save a copy.
At the right-hand side of the image listing, click the More drop down menu, then click into Manage Permissions:
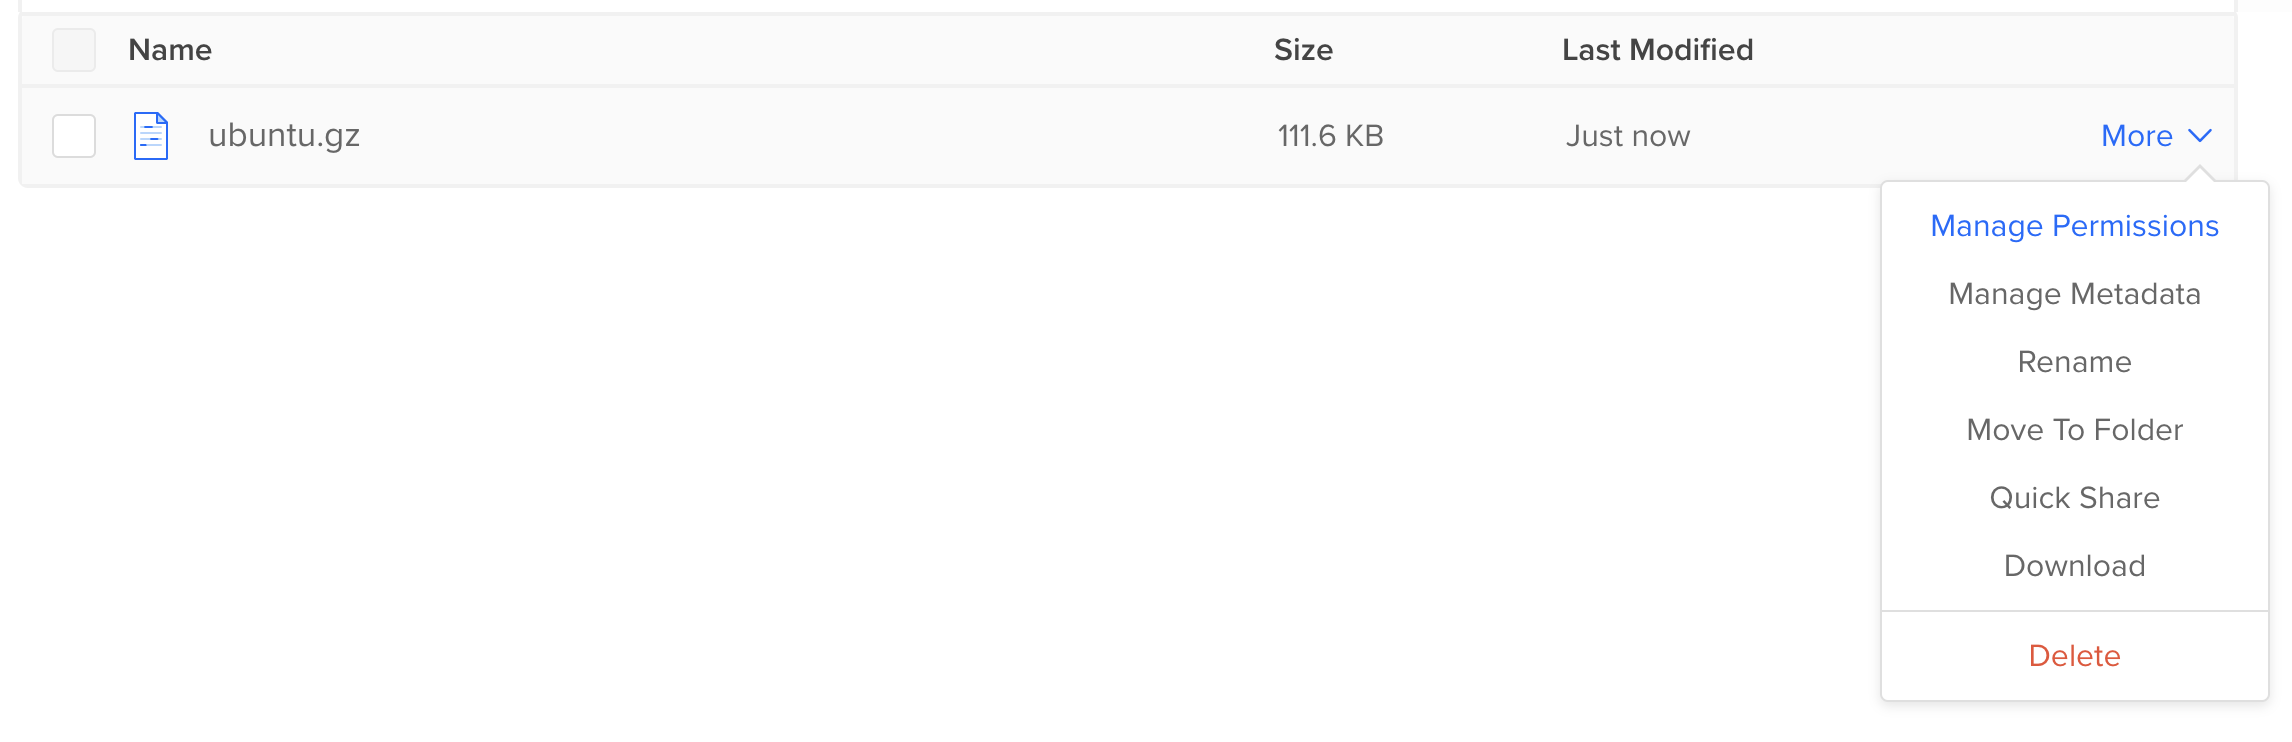
Then, click the radio button next to Public and hit Update to make the image publicly accessible.
Warning: Your image will temporarily be publicly accessible to anyone with its Spaces path during this process. If you'd like to avoid making your image temporarily public, you can create your Custom Image using the DigitalOcean API. Be sure to set your image to Private using the above procedure after your image has successfully been transferred to Custom Images.
Fetch the Spaces URL for your image by hovering over the image name in the Control Panel, and hit Copy URL in the window that pops up.
Now, navigate to Images in the left hand navigation bar, and then Custom Images.
From here, upload your image using this URL as detailed in the Custom Images Product Documentation.
You can then create a Droplet from this image. Note that you need to add an SSH key to the Droplet on creation. To learn how to do this, consult How to Add SSH Keys to Droplets.
Once your Droplet boots up, if you can SSH into it, you've successfully launched your Custom Image as a DigitalOcean Droplet.
Debugging
If you attempt to SSH into your Droplet and are unable to connect, ensure that your image meets the listed requirements and has both
cloud-init and SSH installed and properly configured. If you still can't access the Droplet, you can attempt to use the DigitalOcean Droplet Console and the non-root user you created earlier to explore the system and debug your networking, cloud-init and SSH configurations. Another way of debugging your image is to use a virtualization tool like Virtualbox to boot up your disk image inside of a virtual machine, and debug your system's configuration from within the VM.Conclusion
In this guide, you've learned how to create a disk image of an Ubuntu 18.04 system using the
ddcommand line utility and upload it to DigitalOcean as a Custom Image from which you can launch Droplets.
The steps in this guide may vary depending on your operating system, existing hardware, and kernel configuration but, in general, images created from popular Linux distributions should work using this method. Be sure to carefully follow the steps for installing and configuring
cloud-init, and ensure that your system meets all the requirements listed in the prerequisites section above.
To learn more about Custom Images, consult the Custom Images product documentation.