I TO CLOUD COMPUTING

I AM

image
Hello,

I'm AKASH PATEL

10+ years of experience in Telecom/IT Cloud industry & Network Environment And Excellent Ability to troubleshoot Cloud/Infra/Network issues. Ability and willingness to keep abreast of technological developments with a strong ability to adapt quickly to rapidly changing the environment. Exceptional analytical, evaluative and technical problem-solving skills. Excellent organizational skills with the ability to work independently, to set priorities and to work efficiently under pressure, able to multitask and meet short/long term deadlines, work efficiency as a team member.

Also, I have a strong customer focus experience, be a great communicator, ability to diagnose and resolve complex service interruptions. Have initiative and passion to implement improvement strategies, in order to mitigate future outages and capacity to prioritize in a rapidly growing environment. self-starter and look for opportunities to prevent outages, rather than simply responding to troubles.


Education
RYERSON UNIVERSITY

Toronto,Canada.

MASTER ENGINEERING IN COMPUTER NETWORKS

B H GARDI COLLEGE OF ENG. & TECH.

Gujarat,India.

BACHELOR OF ENGINEERING IN COMPUTER SCIENCE


Experience
Cloud Engineer

Nokia

Senior Project Engineer

Wipro Limited

Deployment Engineer

INFINITY

Network Support Analyst

IBM

Network Field Engineer

BFG Enterprise Services

Technical Specialist

VODAFONE

Network Technician

Freelancer.com


Certifications
Google Professional Cloud Architect

Google

CKA: Certified Kubernetes Administrator

The Linux Foundation

Microsoft Certified: Azure Solutions Architect Expert

Microsoft

NCS R20 Integration Engineer

NOKIA

CCNA, CCNP TSHOOT, CCIE WRITTEN

Cisco

JNCIA-JUNOS

JUNIPER


My Skills
Cloud Troubleshooting
Cloud configuration
Cloud Design
Docker & Kubernets
Project Management
Cybersecurity
Firewall & Load Balancer

WHAT CAN I DO

DevOps

Responsible for the configuration, deployment, and day to day management of our customer's resources like server and application in a environment. and Managing the various branches of code & Automation of repetitive tasks.Conducting the testing protocol and critical monitoring.

Kubernetes

Responsible for all aspects of orchestration platform for managing, automating, and scaling containerized applications oprations. Orchestrate containers across multiple hosts.Make better use of hardware to maximize resources needed to run your enterprise apps. Control and automate application deployments and updates. Health-check and self-heal your apps with autoplacement, autorestart, autoreplication, and autoscaling.

Cloud Scale

As part of our fast-paced growing Cloud & Managed Services, we Responsible for adding or removing compute, storage, and network services to meet the demands a workload makes for resources in order to maintain availability and performance as utilization increases.

System

As a System Engineer performs a wide variety of installation, configuration and upgrading of workstations, servers and related hardware and software in system environment. Also, provides investigation, diagnostic testing and repair/resolution of system, hardware, software and infrastructure.

Troubleshooting

Primary goal is to make sure that your network equipment is operating properly at all times. But we all know that any equipment can break down. In case responsibility is to identify and isolate the cause of the malfunction and correct it as soon as you can.

LAN/WAN

Analyze, test, troubleshoot, and evaluate existing network systems, such as local area network (LAN), wide area network (WAN), and Internet systems or a segment of a network system. Perform network maintenance to ensure networks operate correctly with minimal interruption.

Firewall

Responsible for the configuration, deployment, and day to day management of our customer's next-generation firewall solution in a environment. monitoring, configuration changes, Firewall rule updates, accounts, and software updates while working alongside with team of cybersecurity experts.

Data Center

Responsible for all aspects of Data Center operations. With the help of Facilities and IT, manage the Data Center environment, monitor for issues, control access and ensure overall uninterrupted operations. Also, experience in a large, enterprise, multi-location data center environment, experience handling electrical and mechanical functions.

Cloud

As part of our fast-paced growing Cloud & Managed Services, we engaged across assigned customers to manage, support, secure and maintain their cloud or hosted environments. Also, maintain and grow our Cloud & Security knowledge and to ensure that we continue to comply to the best practices while being secure.

Blogs
Showing posts with label #All. Show all posts

How To Install MySQL on Ubuntu 18.04

Introduction

MySQL is an open-source database management system, commonly installed as part of the popular LAMP(Linux, Apache, MySQL, PHP/Python/Perl) stack. It uses a relational database and SQL (Structured Query Language) to manage its data.
The short version of the installation is simple: update your package index, install the mysql-serverpackage, and then run the included security script.
  • sudo apt update
  • sudo apt install mysql-server
  • sudo mysql_secure_installation
This tutorial will explain how to install MySQL version 5.7 on an Ubuntu 18.04 server. However, if you're looking to update an existing MySQL installation to version 5.7, you can read this MySQL 5.7 update guideinstead.

Prerequisites

To follow this tutorial, you will need:

Step 1 — Installing MySQL

On Ubuntu 18.04, only the latest version of MySQL is included in the APT package repository by default. At the time of writing, that's MySQL 5.7
To install it, update the package index on your server with apt:
  • sudo apt update
Then install the default package:
  • sudo apt install mysql-server
This will install MySQL, but will not prompt you to set a password or make any other configuration changes. Because this leaves your installation of MySQL insecure, we will address this next.

Step 2 — Configuring MySQL

For fresh installations, you'll want to run the included security script. This changes some of the less secure default options for things like remote root logins and sample users. On older versions of MySQL, you needed to initialize the data directory manually as well, but this is done automatically now.
Run the security script:
  • sudo mysql_secure_installation
This will take you through a series of prompts where you can make some changes to your MySQL installation’s security options. The first prompt will ask whether you’d like to set up the Validate Password Plugin, which can be used to test the strength of your MySQL password. Regardless of your choice, the next prompt will be to set a password for the MySQL root user. Enter and then confirm a secure password of your choice.
From there, you can press Y and then ENTER to accept the defaults for all the subsequent questions. This will remove some anonymous users and the test database, disable remote root logins, and load these new rules so that MySQL immediately respects the changes you have made.
To initialize the MySQL data directory, you would use mysql_install_db for versions before 5.7.6, and mysqld --initialize for 5.7.6 and later. However, if you installed MySQL from the Debian distribution, as described in Step 1, the data directory was initialized automatically; you don't have to do anything. If you try running the command anyway, you'll see the following error:
Output
mysqld: Can't create directory '/var/lib/mysql/' (Errcode: 17 - File exists)
. . .
2018-04-23T13:48:00.572066Z 0 [ERROR] Aborting
Note that even though you’ve set a password for the root MySQL user, this user is not configured to authenticate with a password when connecting to the MySQL shell. If you’d like, you can adjust this setting by following Step 3.

Step 3 — (Optional) Adjusting User Authentication and Privileges

In Ubuntu systems running MySQL 5.7 (and later versions), the root MySQL user is set to authenticate using the auth_socket plugin by default rather than with a password. This allows for some greater security and usability in many cases, but it can also complicate things when you need to allow an external program (e.g., phpMyAdmin) to access the user.
In order to use a password to connect to MySQL as root, you will need to switch its authentication method from auth_socket to mysql_native_password. To do this, open up the MySQL prompt from your terminal:
  • sudo mysql
Next, check which authentication method each of your MySQL user accounts use with the following command:
  • SELECT user,authentication_string,plugin,host FROM mysql.user;
Output
+------------------+-------------------------------------------+-----------------------+-----------+ | user | authentication_string | plugin | host | +------------------+-------------------------------------------+-----------------------+-----------+ | root | | auth_socket | localhost | | mysql.session | *THISISNOTAVALIDPASSWORDTHATCANBEUSEDHERE | mysql_native_password | localhost | | mysql.sys | *THISISNOTAVALIDPASSWORDTHATCANBEUSEDHERE | mysql_native_password | localhost | | debian-sys-maint | *CC744277A401A7D25BE1CA89AFF17BF607F876FF | mysql_native_password | localhost | +------------------+-------------------------------------------+-----------------------+-----------+ 4 rows in set (0.00 sec)
In this example, you can see that the root user does in fact authenticate using the auth_socket plugin. To configure the root account to authenticate with a password, run the following ALTER USER command. Be sure to change password to a strong password of your choosing, and note that this command will change the root password you set in Step 2:
  • ALTER USER 'root'@'localhost' IDENTIFIED WITH mysql_native_password BY 'password';
Then, run FLUSH PRIVILEGES which tells the server to reload the grant tables and put your new changes into effect:
  • FLUSH PRIVILEGES;
Check the authentication methods employed by each of your users again to confirm that root no longer authenticates using the auth_socket plugin:
  • SELECT user,authentication_string,plugin,host FROM mysql.user;
Output
+------------------+-------------------------------------------+-----------------------+-----------+ | user | authentication_string | plugin | host | +------------------+-------------------------------------------+-----------------------+-----------+ | root | *3636DACC8616D997782ADD0839F92C1571D6D78F | mysql_native_password | localhost | | mysql.session | *THISISNOTAVALIDPASSWORDTHATCANBEUSEDHERE | mysql_native_password | localhost | | mysql.sys | *THISISNOTAVALIDPASSWORDTHATCANBEUSEDHERE | mysql_native_password | localhost | | debian-sys-maint | *CC744277A401A7D25BE1CA89AFF17BF607F876FF | mysql_native_password | localhost | +------------------+-------------------------------------------+-----------------------+-----------+ 4 rows in set (0.00 sec)
You can see in this example output that the root MySQL user now authenticates using a password. Once you confirm this on your own server, you can exit the MySQL shell:
  • exit
Alternatively, some may find that it better suits their workflow to connect to MySQL with a dedicated user. To create such a user, open up the MySQL shell once again:
  • sudo mysql
Note: If you have password authentication enabled for root, as described in the preceding paragraphs, you will need to use a different command to access the MySQL shell. The following will run your MySQL client with regular user privileges, and you will only gain administrator privileges within the database by authenticating:
  • mysql -u root -p


From there, create a new user and give it a strong password:
  • CREATE USER 'sammy'@'localhost' IDENTIFIED BY 'password';
Then, grant your new user the appropriate privileges. For example, you could grant the user privileges to all tables within the database, as well as the power to add, change, and remove user privileges, with this command:
  • GRANT ALL PRIVILEGES ON *.* TO 'sammy'@'localhost' WITH GRANT OPTION;
Note that, at this point, you do not need to run the FLUSH PRIVILEGES command again. This command is only needed when you modify the grant tables using statements like INSERTUPDATE, or DELETE. Because you created a new user, instead of modifying an existing one, FLUSH PRIVILEGES is unnecessary here.
Following this, exit the MySQL shell:
  • exit
Finally, let's test the MySQL installation.

Step 4 — Testing MySQL

Regardless of how you installed it, MySQL should have started running automatically. To test this, check its status.
  • systemctl status mysql.service
You'll see output similar to the following:
Output
● mysql.service - MySQL Community Server
   Loaded: loaded (/lib/systemd/system/mysql.service; enabled; vendor preset: en
   Active: active (running) since Wed 2018-04-23 21:21:25 UTC; 30min ago
 Main PID: 3754 (mysqld)
    Tasks: 28
   Memory: 142.3M
      CPU: 1.994s
   CGroup: /system.slice/mysql.service
           └─3754 /usr/sbin/mysqld
If MySQL isn't running, you can start it with sudo systemctl start mysql.
For an additional check, you can try connecting to the database using the mysqladmin tool, which is a client that lets you run administrative commands. For example, this command says to connect to MySQL as root (-u root), prompt for a password (-p), and return the version.
  • sudo mysqladmin -p -u root version
You should see output similar to this:
Output
mysqladmin  Ver 8.42 Distrib 5.7.21, for Linux on x86_64
Copyright (c) 2000, 2018, Oracle and/or its affiliates. All rights reserved.

Oracle is a registered trademark of Oracle Corporation and/or its
affiliates. Other names may be trademarks of their respective
owners.

Server version      5.7.21-1ubuntu1
Protocol version    10
Connection      Localhost via UNIX socket
UNIX socket     /var/run/mysqld/mysqld.sock
Uptime:         30 min 54 sec

Threads: 1  Questions: 12  Slow queries: 0  Opens: 115  Flush tables: 1  Open tables: 34  Queries per second avg: 0.006
This means MySQL is up and running.

Conclusion

You now have a basic MySQL setup installed on your server. Here are a few examples of next steps you can take:
How To Install Webmin on Debian 9

Introduction

Webmin is a modern web control panel for any Linux machine that allows you to administer your server through a simple interface. With Webmin, you can change settings for common packages on the fly.
In this tutorial, you'll install and configure Webmin on your server and secure access to the interface with a valid certificate using Let's Encrypt. You'll then use Webmin to add new user accounts, and update all packages on your server from the dashboard.

Prerequisites

To complete this tutorial, you will need:

Step 1 — Installing Webmin

First, we need to add the Webmin repository so that we can easily install and update Webmin using our package manager. We do this by adding the repository to the /etc/apt/sources.list file.
Open the file in your editor:
  • sudo nano /etc/apt/sources.list
Then add this line to the bottom of the file to add the new repository:
/etc/apt/sources.list
 . . . 
deb http://download.webmin.com/download/repository sarge contrib
Save the file and exit the editor.
Next, add the Webmin PGP key so that your system will trust the new repository:
  • wget http://www.webmin.com/jcameron-key.asc
  • sudo apt-key add jcameron-key.asc
Next, update the list of packages to include the Webmin repository:
  • sudo apt update
Then install Webmin:
  • sudo apt install webmin
Once the installation finishes, you be presented with the following output:
Output
Webmin install complete. You can now login to https://your_server_ip:10000 as root with your root password, or as any user who can use `sudo`.
Please copy down this information, as you will need it for the next step.
Note: If you installed ufw during the prerequisite step, you will need to run the command sudo ufw allow 10000 in order to allow Webmin through the firewall. For extra security, you may want to configure your firewall to only allow access to this port from certain IP ranges.
Let's secure access to Webmin by adding a valid certificate.

Step 2 — Adding a Valid Certificate with Let's Encrypt

Webmin is already configured to use HTTPS, but it uses a self-signed, untrusted certificate. Let's replace it with a valid certificate from Let's Encrypt.
Navigate to https://your_domain:10000 in your web browser, replacing your_domain with the domain name you pointed at your server.
Note: When logging in for the first time, you will see an "Invalid SSL" error. This is because the server has generated a self-signed certificate. Allow the exception to continue so you can replace the self-signed certificate with one from Let's Encrypt.
You'll be presented with a login screen. Sign in with the non-root user you created while fulfilling the prerequisites for this tutorial.
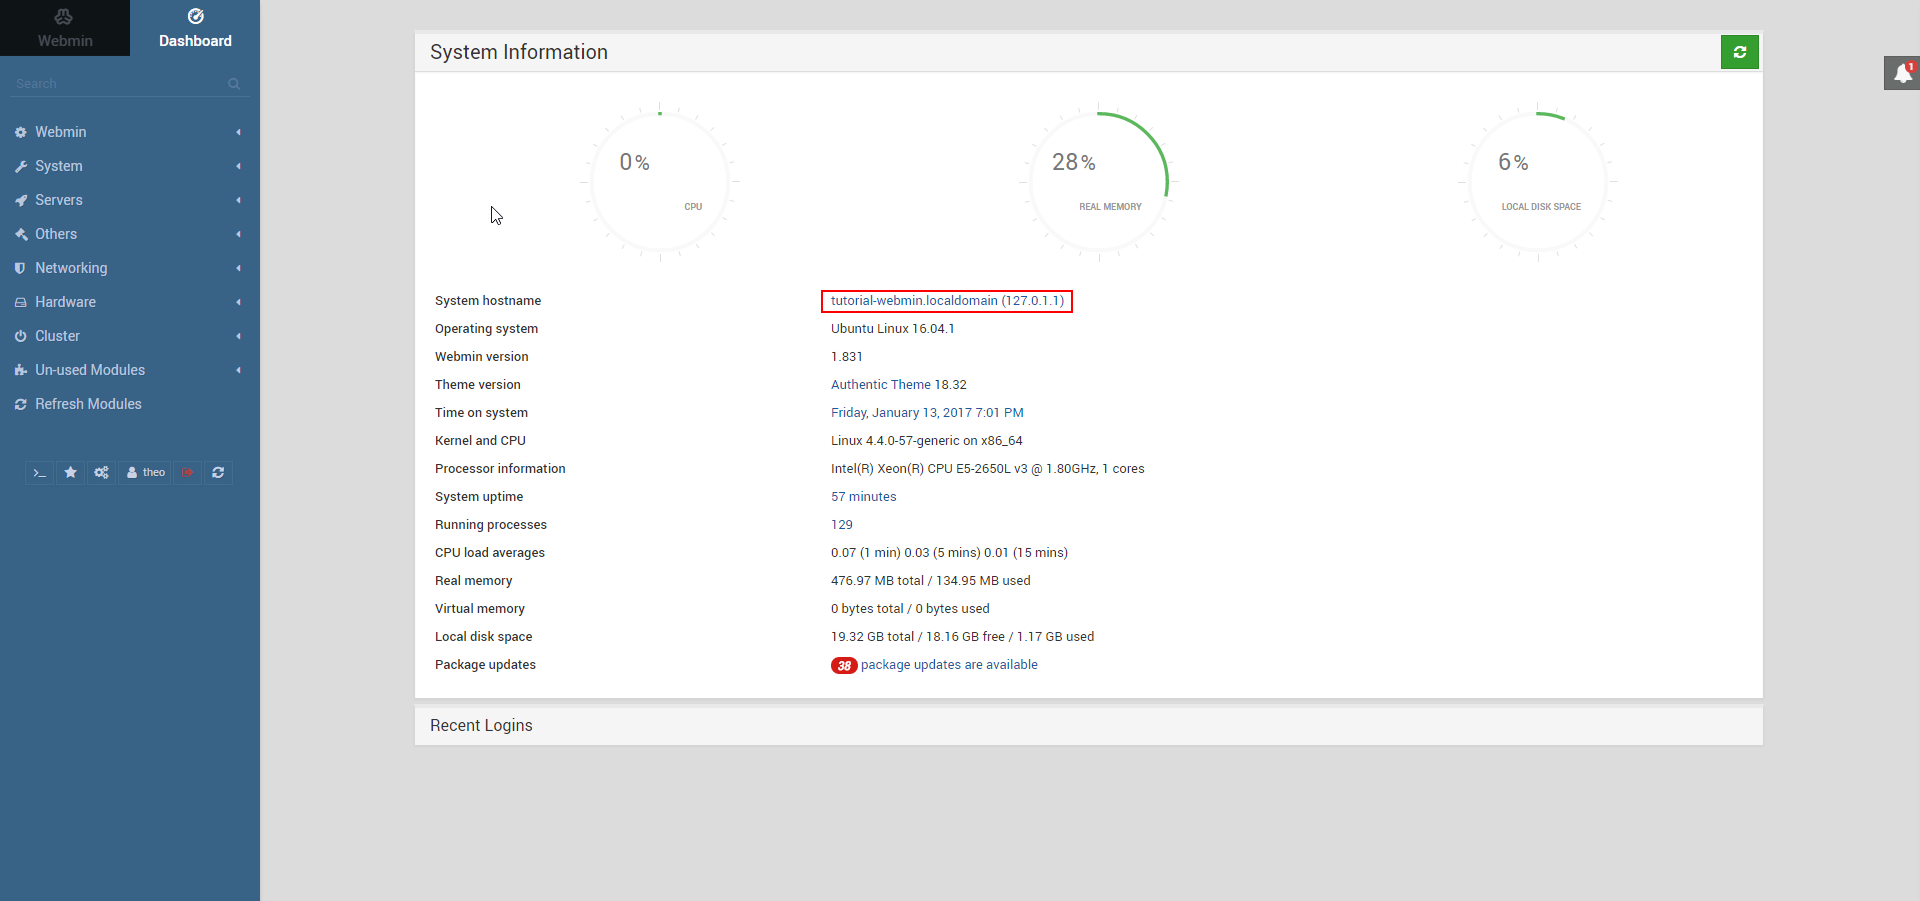
Once you log in, the first screen you will see is the Webmin dashboard. Before you can apply a valid certificate, you have to set the server's hostname. Look for the System hostname field and click on the link to the right, as shown in the following figure:
Image showing where the link is on the Webmin dashboard
This wil take you to the Hostname and DNS Client page. Locate the Hostname field, and enter your Fully-Qualified Domain Name into the field. Then press the Save button at the bottom of the page to apply the setting.
After you've set your hostname, click on Webmin on the left navigation bar, and then click on Webmin Configuration.
Then, select SSL Encryption from the list of icons, and then select the Let's Encrypt tab. You'll see a screen like the following figure:
Image showing the Let's Encrypt tab of the SSL Encryption section
Using this screen, you'll tell Webmin how to obtain and renew your certificate. Let's Encrypt certificates expire after 3 months, but we can instruct Webmin to automatically attempt to renew the Let's Encrypt certificate every month. Let's Encrypt looks for a verification file on our server, so we'll configure Webmin to place the verification file inside the folder /var/www/html, which is the folder that the Apache web server you configured in the prerequisites uses. Follow these steps to set up your certificate:
  1. Fill in Hostnames for certificate with your FQDN.
  2. For Website root directory for validation file, select the Other Directory button and enter /var/www/html.
  3. For Months between automatic renewal section, deselect the Only renew manually option by typing 1 into the input box, and selecting the radio button to the left of the input box.
  4. Click the Request Certificate button. After a few seconds, you will see a confirmation screen.
To use the new certificate, restart Webmin by clicking the back arrow in your browser, and clicking the Restart Webmin button. Wait around 30 seconds, and then reload the page and log in again. Your browser should now indicate that the certificate is valid.

Step 3 – Using Webmin

You've now set up a secured working instance of Webmin. Let's look at how to use it.
Webmin has many different modules that can control everything from the BIND DNS Server to something as simple as adding users to the system. Let's look at how to create a new user, and then explore how to update the operating system using Webmin.

Managing Users and Groups

Let's explore how to manage the users and groups on your server.
First, click the System tab, and then click the Users and Groups button. Then, from here, you can either add a user, manage a user, or add or manage a group.
Let's create a new user called deploy which can be used for hosting web applications. To add a user, click Create a new user, which is located at the top of the users table. This displays the Create User screen, where you can supply the username, password, groups and other options. Follow these instructions to create the user:
  1. Fill in Username with deploy.
  2. Select Automatic for User ID.
  3. Fill in Real Name with a descriptive name like Deployment user.
  4. For Home Directory, select Automatic.
  5. For Shell, select /bin/bash from the dropdown list.
  6. For Password, select Normal Password and type in a password of your choice.
  7. For Primary Group, select New group with same name as user.
  8. For Secondary Group, select sudo from the All groups list, and press the -> button to add the group to the in groups list.
  9. Press Create to create this new user.
When creating a user, you can set options for password expiry, the user's shell, and whether or not they are allowed a home directory.
Next, let's look at how to install updates to our system.

Updating Packages

Webmin lets you update all of your packages through its user interface. To update all of your packages, first, go to the Dashboard link, and then locate the Package updates field. If there are updates available, you'll see a link that states the number of available updates, as shown in the following figure:
Webmin shows the number of updates available
Click this link, and then press Update selected packages to start the update. You may be asked to reboot the server, which you can also do through the Webmin interface.

Conclusion

You now have a secured working instance of Webmin and you've used the interface to create a user and update packages. Webmin gives you access to many things you'd normally need to access through the console, and it organizes them in an intuitive way. For example, if you have Apache installed, you would find the configuration tab for it under Servers, and then Apache.
Explore the interface, or read the Official Webmin wiki to learn more about managing your system with Webmin.

Start Work With Me

Contact Me
Akash Patel
+1 647-473-6333
Toronto, Canada